

even more extravagant figures
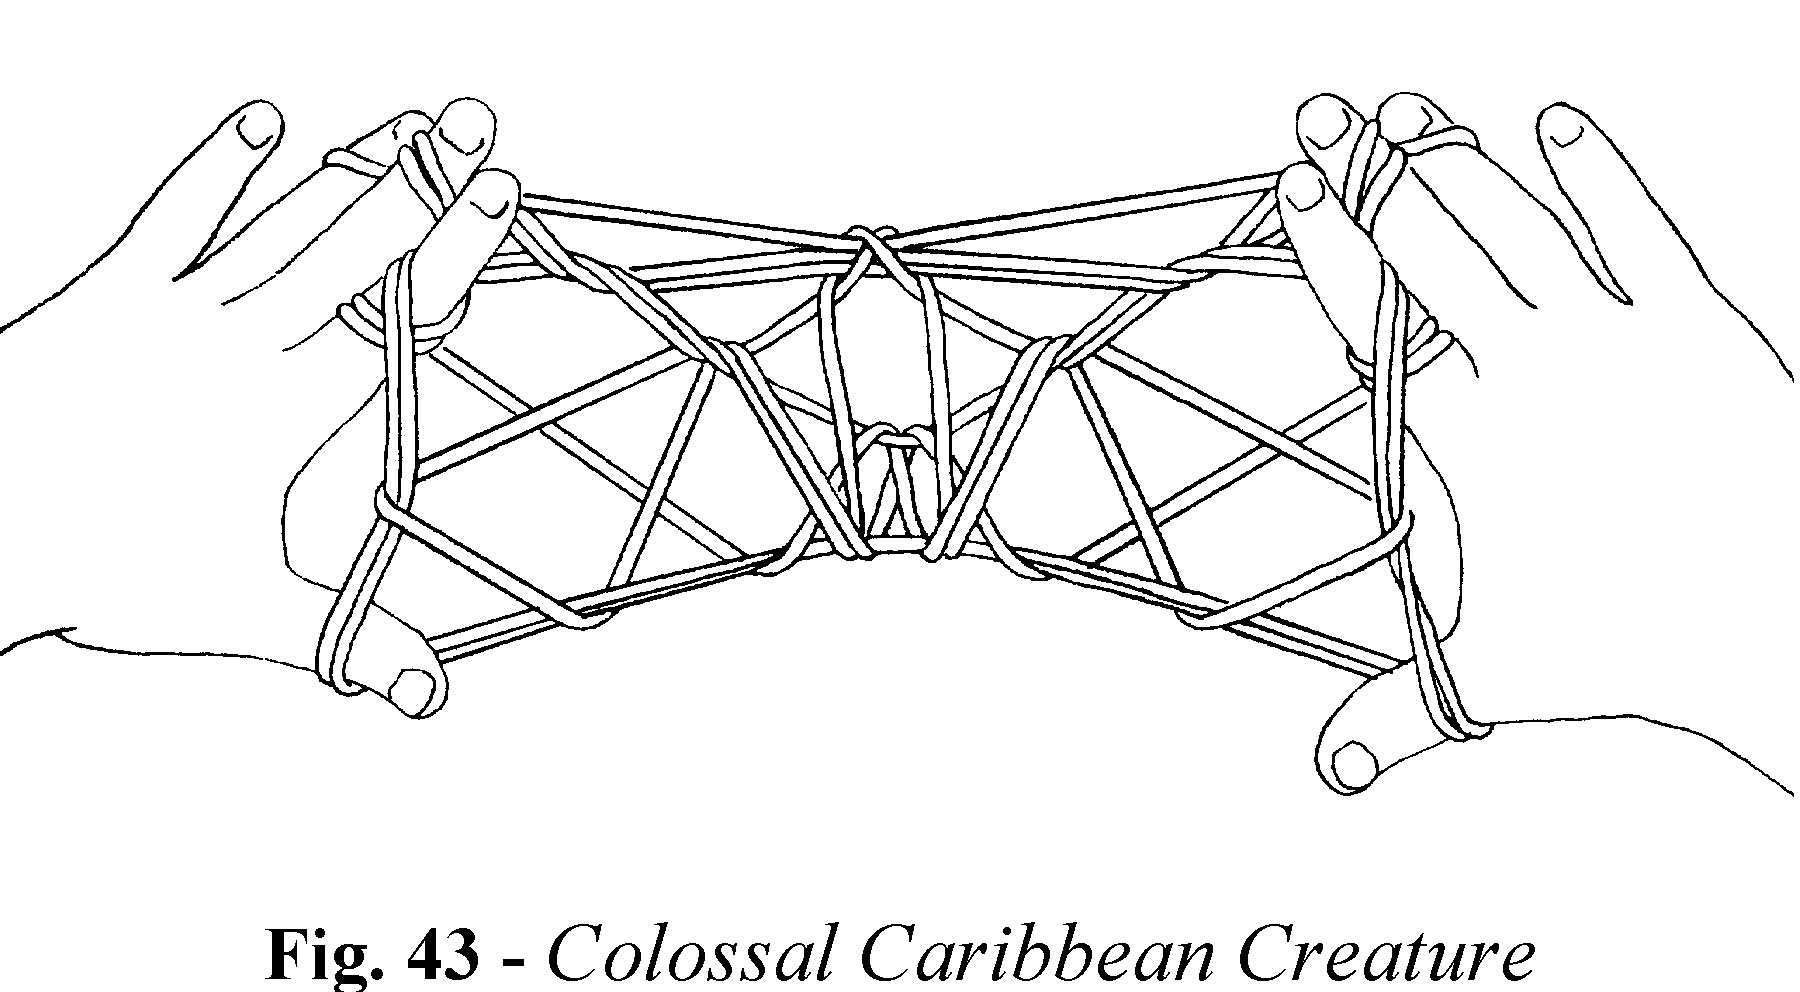
Colossal Caribbean Creature (fig. 43) This figure was invented recently during a leisurely cruise through the Caribbean.
- Set up the Ten Men loom and katilluik the upper and the lower index loops
- .
- Do an Aa weave, but during the A-Universe part pass each thumb over the non-transverse lower far index string only (not both lower far index strings). Finish the weave and reset the loom, but during the last step, transfer the little finger loops rather than thumb loops to the tops of the indices, since the next weave is a backweave.
- Do a BWBa weave, but during the B-Universe part pass each little finger over the non-transverse lower far index string only, and during the a weave part, pick up the non-transverse far thumb string only (in both cases i’m using far in the traditional sense, i.e., “farthest from your body” to avoid confusion).
- Do a d weave, c weave and b' weave, then extend (middle finger picks up the double lower near index string). To complete the figure, lift the central transverse string with each ring finger as in Five-Pointed Star. The formula for this figure is:
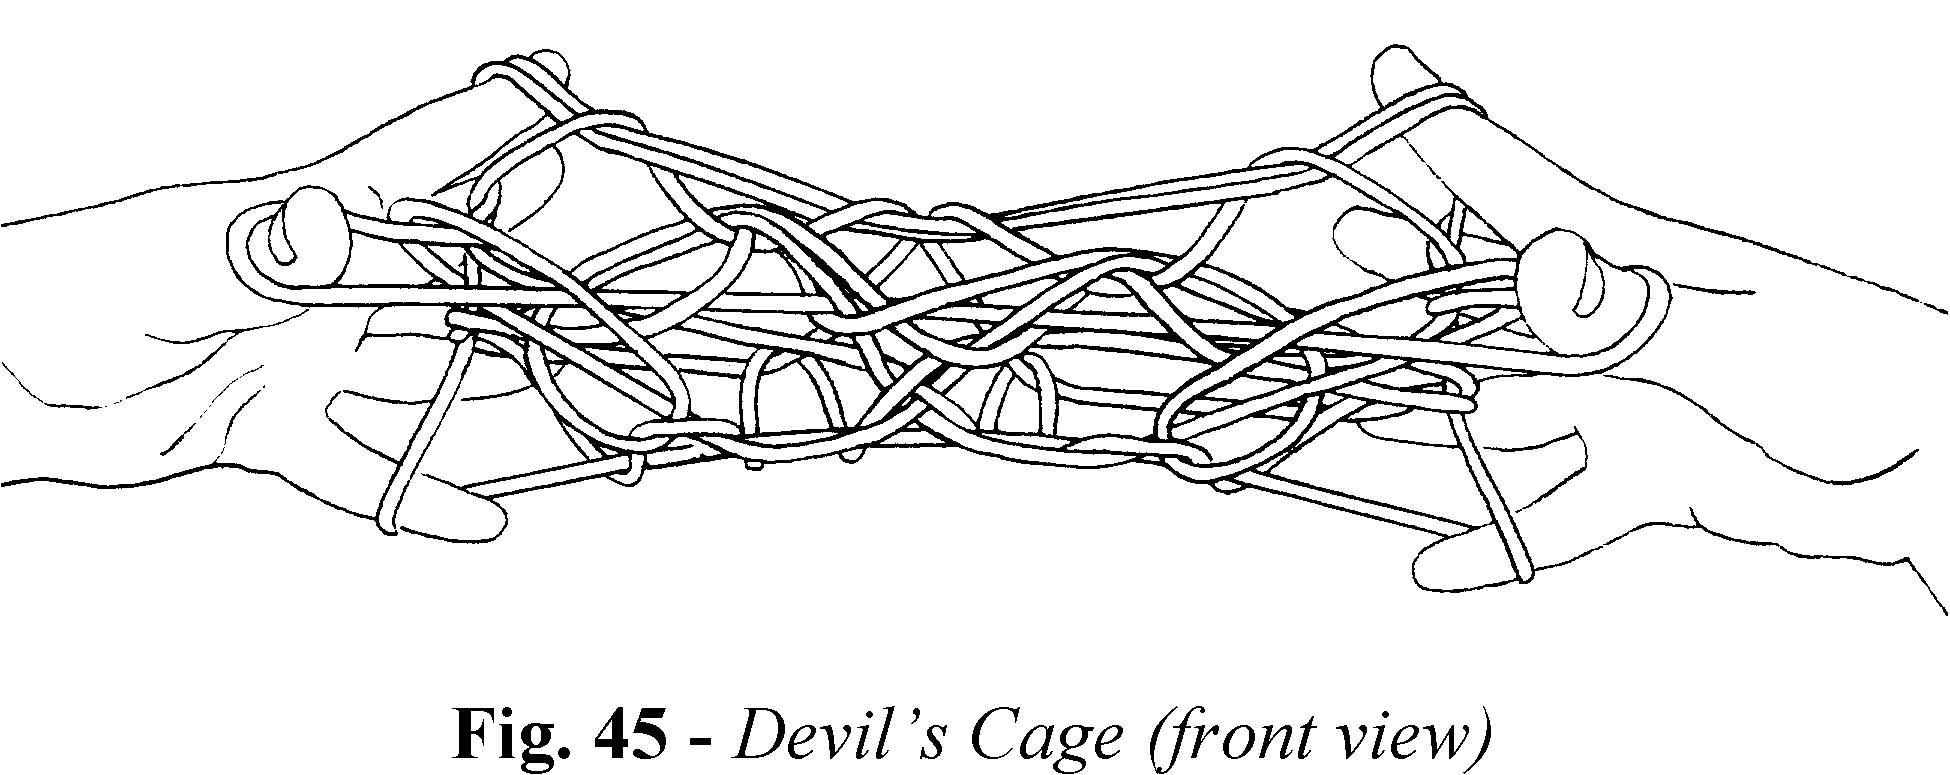
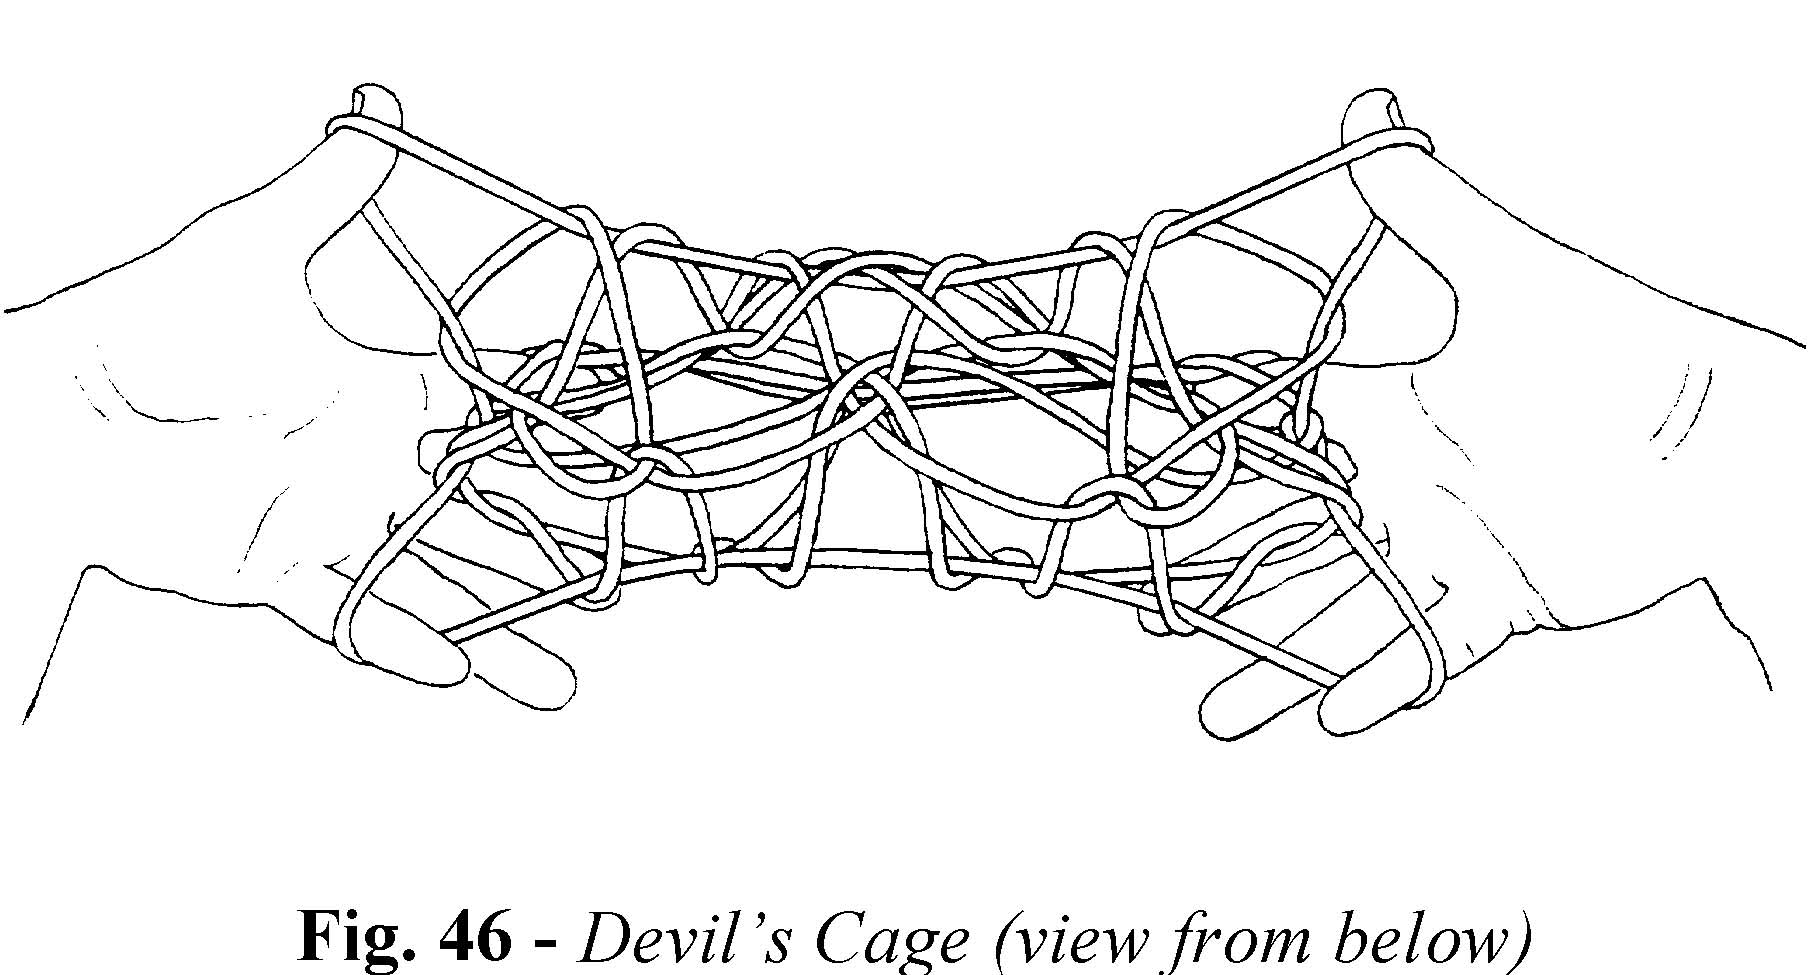
Devil’s Cage (figs. 44, 45, and 46)
This three-dimensional figure opens with a left-handed spiral version of Opening B, otherwise known as a DNA opening. Mark Sherman named this figure Devil’s Cage because of its fiendish difficulty.
- First, form the DNA opening: Start with Opening B (same as Opening A, but pick up the right palmar string first); release the thumb loops; insert the left thumb, from above, into the right index loop and return with the right near index string (rotate thumb toward you and up); insert the right thumb, from below, into the left thumb loop and extend. You know have a left-handed spiral opening (If you point your left hand away from you while keeping your right hand upright, none of the crossing strings should touch).
- Now add another spiral to the loom: Pass the left index away from you over all the strings, then hook up the right far little finger string (rotate the left index towards you and up as you return); insert the right index, from below, into the upper left index loop and extend.
- Transfer the upper index loops to the thumbs, inserting the thumbs from below.
- Transfer the remaining index loops to the ring fingers, inserting the ring figures from above. Keep the transferred loop near the base of the ring finger.
- Transfer the upper thumb loops back to the tops of the indices, inserting the indices from below.
- Again add another spiral to the evolving loom: insert the left thumb, from above, into the right index loop and return with the right near index string (rotate thumb toward you and up); insert the right thumb, from below, into the left upper thumb loop and extend.
- Transfer the index loops to the ring fingers, inserting the ring figures from above. Keep the transferred loop near the top of the ring finger.
- Transfer the upper thumb loops to the middle fingers, inserting the middle fingers from below; transfer the remaining thumb loops to the index fingers, inserting the index fingers from below.
- Katilluik the index loops.
- Transfer the middle finger loops to the index fingers, inserting the index fingers from below, to create upper index loops. Now you are ready to start weaving! (all this turmoil furnishes three loops for weaving and an extra transverse string for the 3-D extension).
- Do an a weave with the upper near ring finger string (pass thumb under both index loops and up between both index loops and both ring finger loops; pick up upper near ring finger string and return); finish the weave (thumb picks up upper near index string, navaho thumb loops) and reset the loom (release upper index loops, transfer thumb loops to index fingers).
- In a similar fashion, do an a' weave with the lower near ring finger string; finish the weave and reset the loom.
- Now do a regular a weave with the near little finger string; finish the weave and reset the loom.
- The last weave is complex: Pass each thumb under the index loops and insert it, from below, into the little finger loop and both sets of ring finger loops; with the thumb hook down the upper far ring finger string, drawing it down through the lower ring finger loop (use the tip of your middle finger to help you do this), then pick up on the back of the thumb the lower far ring finger string and return through the little finger loop (the hooked string will slip off); gently release the thumb loop, then reinsert the thumb from the opposite side; pass the thumb under all the strings, pick up the far little finger string and return, drawing this string through the thumb loop (which slips off); artificially downflip this string (i.e., rotate the thumb loop half a turn away from you), so as to form an inverse weave; finish the weave (pick up the upper near index string, navaho thumb loops) but do not reset the loom (you are now ready to extend the figure).
- With each middle finger pick up the lower double near index string, but don’t release the little finger loops yet. Instead, find the single transverse lower far index string (the one you created with the katilluik move), and hook it down to the palm with your ring fingers, drawing the string through the double loop on each ring finger, which slips off as you close the ring finger to the palm; release the little finger loops and extend to absorb the slack; insert each little finger into the ring finger loop and likewise close the finger to the palm.
- Transfer the thumb loops to the ring fingers, inserting the ring fingers from below; again close the ring fingers to the palm.
- We now perform the last half of Cleaning the Top: Gently withdraw each middle finger from the loop surrounding it; locate the upper index loop (the single loop) and transfer it to the thumb, inserting the thumb from above; transfer the remaining index loop (the double loop) to the thumb as well, inserting the thumb from below (keep the double loop near the tip); insert each index, from above, into the upper (double) and lower (single) thumb loop; pick up the lower near thumb string on its back, drawing it up through the upper thumb loop; now curl your index fingertip around the upper near thumb string (a double transverse string), and draw this string through the loop already on your index finger by rotating the index finger away from you and up (the original index loop will slip off).
- Release all thumb loops and extend, indices pointing upward, ring fingers and little fingers touching the palms (fig. 44).
- Now extend in three-dimensions: Insert each thumb, from below, into the ring finger loop and transfer this loop to the thumb. The near thumb string should be a transverse string. Fig. 45 shows a front view and fig. 46 shows a bottom view.
- Congratulations! If you made it this far you’ve outsmarted the devil (the strings that criss-cross in the center of the figure represent the devil trapped in a prism-shaped cage).
And if you wish to try a hybrid figure, check out my colleague Keith Kaplon's invention of "lightning across the middle".
there is an extraordinary figure keith kaplon, a colleague of mine, invented. i call it lightning across the middle. at this stage in your leartning string figures you should be able to follow the accompanying videos to learn it.
things to consider
you may have your own ideas about new and more wonderful figures. you should try new things for yourself, but i caution you to make sure you take notes as you do so you will be able to recapture any new figure you find. with all these complexities it is easy to forget an essential detail and not be able to re-make a fantastic figure you discover for yourself.